| 角色名 | 主機(jī)IP | MySQL版本 | 數(shù)據(jù)狀態(tài) |
|---|---|---|---|
| MySQL Router | 192.168.100.21 | MySQL 5.7.22 | 無 |
| master | 192.168.100.22 | MySQL 5.7.22 | 全新實(shí)例 |
| slave1 | 192.168.100.23 | MySQL 5.7.22 | 全新實(shí)例 |
| slave2 | 192.168.100.24 | MySQL 5.7.22 | 全新實(shí)例 |
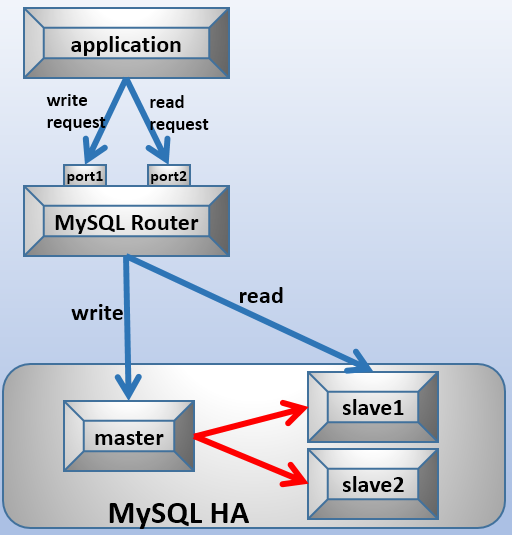
因?yàn)楹蠖薓ySQL主從復(fù)制沒有實(shí)現(xiàn)高可用,所以只有一個(gè)master節(jié)點(diǎn)負(fù)責(zé)寫操作。
所有后端MySQL節(jié)點(diǎn)都是剛安裝好的全新MySQL實(shí)例,所以直接開啟主從復(fù)制即可。如果是已有數(shù)據(jù)的主從復(fù)制,需要先保證它們已同步好,方法見:將slave恢復(fù)到master指定的坐標(biāo)。
二進(jìn)制版MySQL Router下載地址:https://dev.mysql.com/downloads/router/
rpm倉庫:http://repo.mysql.com/yum/mysql-tools-community/el/7/x86_64/
此處使用二進(jìn)制版的MySQL Router 2.1.6。
tar xf mysqlrouter-2.1.6-linux-glibc2.12-x86-64bit.tar.gz
mv mysqlrouter-2.1.6-linux-glibc2.12-x86-64bit /usr/local/mysqlrouter
這就完了,就這么簡單。
解壓二進(jìn)制包后,解壓目錄下有以下幾個(gè)文件。
[root@s1 mr]# ls
bin  data  include  lib  run  share
bin目錄下只有一個(gè)二進(jìn)制程序mysqlrouter,這也是MySQL Router的主程序。
share目錄下有示例配置文件和示例SysV風(fēng)格的啟動腳本,但是很不幸該腳本基于debian平臺,在redhat系列上需要修改和安裝一些東西才能使用。所以后文我自己寫了一個(gè)centos下的SysV腳本。
[root@s1 mr]# ls share/doc/mysqlrouter/
License.txt  README.txt  sample_mysqlrouter.conf  sample_mysqlrouter.init
最后,將主程序添加到PATH環(huán)境變量中。
echo "PATH=$PATH:/usr/local/mysqlrouter/bin" >/etc/profile.d/mysqlrouter.sh
chmod +x /etc/profile.d/mysqlrouter.sh
source /etc/profile.d/mysqlrouter.sh
以下是上述實(shí)驗(yàn)環(huán)境的配置文件,這里只有一個(gè)master節(jié)點(diǎn)192.168.100.22:3306,如果有多個(gè)寫節(jié)點(diǎn)(master),則使用逗號分隔各節(jié)點(diǎn)。關(guān)于配置文件,后文會解釋。
[DEFAULT]
config_folder = /etc/mysqlrouter
logging_folder = /usr/local/mysqlrouter/log
runtime_folder = /var/run/mysqlrouter

[logger]
level = INFO

[routing:slaves]
bind_address = 192.168.100.21:7001
destinations = 192.168.100.23:3306,192.168.100.24:3306
mode = read-only
connect_timeout = 1

[routing:masters]
bind_address = 192.168.100.21:7002
destinations = 192.168.100.22:3306
mode = read-write
connect_timeout = 2
然后在MySQL Router所在的機(jī)器上創(chuàng)建上面使用的目錄。
shell> mkdir /etc/mysqlrouter /usr/local/mysqlrouter/log /var/run/mysqlrouter
這樣就可以啟動MySQL Router來提供服務(wù)了(啟動之前,請確保后端MySQL已被配置好主從復(fù)制)。
[root@s1 mr]# mysqlrouter
[1] 16122
查看監(jiān)聽狀態(tài)。這里監(jiān)聽的兩個(gè)端口7001和7002是前端連接MySQL Router用的,它們用來接收前端發(fā)送的SQL請求,并按照讀、寫規(guī)則,將SQL請求路由到后端MySQL主從節(jié)點(diǎn)。
[root@s1 mr]# netstat -tnlp
Active Internet connections (only servers)
Proto Recv-Q Send-Q Local Address        Foreign Address  State   PID/Program name
tcp        0      0 0.0.0.0:6032         0.0.0.0:*        LISTEN  1231/proxysql
tcp        0      0 0.0.0.0:6033         0.0.0.0:*        LISTEN  1231/proxysql
tcp        0      0 0.0.0.0:22           0.0.0.0:*        LISTEN  1152/sshd
tcp        0      0 192.168.100.21:7001  0.0.0.0:*        LISTEN  16122/mysqlrouter
tcp        0      0 127.0.0.1:25         0.0.0.0:*        LISTEN  2151/master
tcp        0      0 192.168.100.21:7002  0.0.0.0:*        LISTEN  16122/mysqlrouter
tcp6       0      0 :::22                :::*             LISTEN  1152/sshd
tcp6       0      0 ::1:25               :::*             LISTEN  2151/master
查看日志:
[root@s1 mr]# cat /usr/local/mysqlrouter/log/mysqlrouter.log
2018-07-07 10:14:29 INFO  [7f8a8e253700] [routing:slaves] started: listening on 192.168.100.21:7001; read-only

2018-07-07 10:14:29 INFO  [7f8a8ea54700] [routing:masters] started: listening on 192.168.100.21:7002; read-write
最后進(jìn)行測試即可。測試前,先在后端Master上授權(quán)MySQL Router節(jié)點(diǎn)允許連接,它將會復(fù)制到兩個(gè)slave節(jié)點(diǎn)上。
mysql> grant all on *.* to root@'192.168.100.%' identified by 'P@ssword1!';
連上MySQL Router的7002端口,這個(gè)端口是負(fù)責(zé)寫的端口。由于沒有配置主從高可用,所以,簡單測試下是否能寫即可。
[root@s1 mr]# mysql -uroot -pP@ssword1! -h192.168.100.21 -P7002 -e 'select @@server_id;'
mysql: [Warning] Using a password on the command line interface can be insecure.
+-------------+
| @@server_id |
+-------------+
|         110 |
+-------------+

[root@s1 mr]# mysql -uroot -pP@ssword1! -h192.168.100.21 -P7002 -e 'create database mytest;'
mysql: [Warning] Using a password on the command line interface can be insecure.

[root@s1 mr]# mysql -uroot -pP@ssword1! -h192.168.100.21 -P7002 -e 'show databases;'
mysql: [Warning] Using a password on the command line interface can be insecure.
+--------------------+
| Database           |
+--------------------+
| information_schema |
| mysql              |
| mytest             |
| performance_schema |
| sys                |
+--------------------+
再測試下各slave節(jié)點(diǎn),是否能實(shí)現(xiàn)rr調(diào)度算法的讀請求的負(fù)載均衡。
[root@s1 mr]# mysql -uroot -pP@ssword1! -h192.168.100.21 -P7001 -e 'select @@server_id;'
mysql: [Warning] Using a password on the command line interface can be insecure.
+-------------+
| @@server_id |
+-------------+
|         120 |
+-------------+

[root@s1 mr]# mysql -uroot -pP@ssword1! -h192.168.100.21 -P7001 -e 'select @@server_id;'
mysql: [Warning] Using a password on the command line interface can be insecure.
+-------------+
| @@server_id |
+-------------+
|         130 |
+-------------+

[root@s1 mr]# mysql -uroot -pP@ssword1! -h192.168.100.21 -P7001 -e 'show databases;'
mysql: [Warning] Using a password on the command line interface can be insecure.
+--------------------+
| Database           |
+--------------------+
| information_schema |
| mysql              |
| mytest             |
| performance_schema |
| sys                |
+--------------------+
顯然,測試的結(jié)果一切正常。
這樣看來MySQL Router好簡單,確實(shí)好簡單。只需提供一個(gè)合理的配置文件,一切都完成了。那么,下面解釋下MySQL Router的配置文件。
MySQL Router的配置文件也很簡單,需要配置的項(xiàng)不多。
mysql router默認(rèn)會尋找安裝目錄下的"mysqlrouter.conf"和家目錄下的".mysqlrouter.conf"。也可以在二進(jìn)制程序mysqlrouter命令下使用"-c"或者"--config"手動指定配置文件。
MySQL router的配置文件是片段式的,常用的就3個(gè)片段:[DEFAULT]、[logger]、[routing:NAME]。片段名稱區(qū)分大小寫,且只支持單行"#"或";"注釋,不支持行中、行尾注釋。
以上面示例的配置文件為例。
[DEFAULT]
config_folder = /etc/mysqlrouter
logging_folder = /usr/local/mysqlrouter/log
runtime_folder = /var/run/mysqlrouter

[logger]
level = INFO

[routing:slaves]
bind_address = 192.168.100.21:7001
destinations = 192.168.100.23:3306,192.168.100.24:3306
mode = read-only
connect_timeout = 1

[routing:masters]
bind_address = 192.168.100.21:7002
destinations = 192.168.100.22:3306
mode = read-write
connect_timeout = 2
[DEFAULT]片段通常配置配置文件的目錄、日志的目錄、MySQL router運(yùn)行時(shí)的目錄(如pid文件)。
例如:
[DEFAULT]
config_folder=/etc/mysqlrouter   # 指定額外的配置文件目錄,該目錄下的conf文件都會被加載
logging_folder=/usr/local/mysqlrouter/log  # 指定日志目錄,日志文件名為mysqlrouter.log
runtime_folder=/var/run/mysqlrouter        # 指定運(yùn)行時(shí)目錄,默認(rèn)為/run/mysqlrouter
[logger]片段只有一個(gè)選項(xiàng),設(shè)置日志的記錄級別。
[logger]
level=debug   # 有debug、info(默認(rèn))、warning、error、fatal,不區(qū)分大小寫
[routing:NAME]是MySQL router主要部分,設(shè)置不同的路由實(shí)例,其中NAME可以隨意命名。如[routing:slaves]、[routing:masters]。
在routing配置片段,可以設(shè)置的選項(xiàng)包括:
(1).bind_address和bind_port
bind_address和bind_port是mysql router監(jiān)聽前端SQL請求的地址和端口。其中端口是MySQL Router要求強(qiáng)制提供的,但可以不用bind_port綁定,因?yàn)樗捎猛ㄟ^bind_address的IP:PORT格式指定。
一個(gè)routing規(guī)則中只能設(shè)置一個(gè)地址監(jiān)聽指令,但可以通過"0.0.0.0"來監(jiān)聽主機(jī)上所有的地址。如果沒有提供監(jiān)聽地址,則默認(rèn)監(jiān)聽127.0.0.1。
另外,監(jiān)聽地址不能出現(xiàn)在destinations指令指定的列表中。
示例如下:
[routing:slaves]
bind_port = 7001
[routing:slaves]
bind_address = 192.168.100.21
bind_port = 7001
[routing:slaves]
bind_address = 192.168.100.21:7001
一般來說,通過不同端口實(shí)現(xiàn)讀/寫分離,并非好方法,最大的原因是需要在應(yīng)用程序代碼中指定這些連接端口。但是,MySQL Router只能通過這種方式實(shí)現(xiàn)讀寫分離,所以MySQL Router拿來當(dāng)玩具玩玩就好。
(2).destinations
定義routing規(guī)則的轉(zhuǎn)發(fā)目標(biāo),格式為HOST:PORT,HOST可以是IP也可以是主機(jī)名,多個(gè)轉(zhuǎn)發(fā)目標(biāo)使用逗號分隔。如定義的目標(biāo)列表是多個(gè)slave。
[routing:slaves]
bind_address = 192.168.100.21:7001
destinations = 192.168.100.23:3306,192.168.100.24:3306
[routing:masters]
bind_address = 192.168.100.21:7002
destinations = 192.168.100.22:3306,192.168.100.100:3306
(3).mode
MySQL router提供兩種mode:read-only和read-write。這兩種方式會產(chǎn)生不同的轉(zhuǎn)發(fā)調(diào)度方式。
設(shè)置為read-write,常用于設(shè)置destinations為master時(shí),實(shí)現(xiàn)master的高可用。
設(shè)置為read-only,常用于設(shè)置destinations為slave時(shí),實(shí)現(xiàn)MySQL讀請求負(fù)載均衡。
(4).connect_timeout
(5).其他選項(xiàng)
還能設(shè)置一些其他的指令,如使用的協(xié)議、最大請求數(shù)等,但是都可以不用設(shè)置使用默認(rèn)值,它們都是MySQL Router結(jié)合MySQL優(yōu)化過的一些選項(xiàng),本身已經(jīng)較完美了。
配置文件大概就這些內(nèi)容,配置好后,記得先創(chuàng)建default片段中涉及到的目錄。之后就可以啟動mysql router提供讀/寫分離服務(wù)了。
MySQL Router只提供了一個(gè)主程序(bin目錄下的mysqlrouter),且該程序只能啟動,沒有停止選項(xiàng),所以只能使用kill命令來殺掉進(jìn)程。
MySQL Router也提供了示例啟動腳本,該腳本在位置為$basedir/share/doc/mysqlrouter/sample_mysqlrouter.init,但是該腳本是基于Debian平臺的,在CentOS上需要設(shè)置和安裝一些東西,所以不用它,自己寫個(gè)粗糙點(diǎn)的腳本即可。
shell> vim /etc/init.d/mysqlrouter
#!/bin/bash

# chkconfig: - 78 30
# Description: Start / Stop MySQL Router

DAEMON=/usr/local/mysqlrouter
proc=$DAEMON/bin/mysqlrouter
DAEMON_OPTIONS="-c ${DAEMON}/mysqlrouter.conf"

. /etc/init.d/functions

start() {
    if [ -e /var/lock/subsys/mysqlrouter ]; then
        action "MySQL Router is working" /bin/false
    else
        $proc $DAEMON_OPTIONS  >/dev/null
        retval=$?
        echo
    if [ $retval -eq 0 ]; then
             touch /var/lock/subsys/mysqlrouter
        action "Starting MySQL Router" /bin/true
        else
        echo "Starting MySQL Router Failure"
        fi
    fi
}

stop() {
    if [ -e /var/lock/subsys/mysqlrouter ]; then
        killall $proc
        retval=$?
        echo
        if [ $retval -eq 0 ]; then
            rm -f /var/lock/subsys/mysqlrouter
            action "Stoping MySQL Router" /bin/true
        fi
    else
        action "MySQL Router is not working" /bin/false
    fi
}

status() {
    if [ -e /var/lock/subsys/mysqlrouter ]; then
        echo "MySQL Router is running"
    else
        echo "MySQL Router is not running"
    fi
}

case "$1" in
    start)
        start
        sleep 1
        ;;
     stop)
        stop
        sleep 1
        ;;
    restart)
        stop
        start
        sleep 1
        ;;
    status)
        status
        ;;
    *)
        echo "Usage: $0 {start|stop|status|restart}"
        retval=1
        ;;
esac

exit $retval
然后賦予執(zhí)行權(quán)限。
shell> chmod +x /etc/init.d/mysqlrouter
到此這篇關(guān)于MySQL Router實(shí)現(xiàn)MySQL的讀寫分離的方法的文章就介紹到這了,更多相關(guān)MySQL Router 讀寫分離內(nèi)容請搜索腳本之家以前的文章或繼續(xù)瀏覽下面的相關(guān)文章希望大家以后多多支持腳本之家!
標(biāo)簽:麗水 徐州 自貢 西寧 無錫 南充 迪慶 龍巖
巨人網(wǎng)絡(luò)通訊聲明:本文標(biāo)題《MySQL Router實(shí)現(xiàn)MySQL的讀寫分離的方法》,本文關(guān)鍵詞 MySQL,Router,實(shí)現(xiàn),的,讀寫,;如發(fā)現(xiàn)本文內(nèi)容存在版權(quán)問題,煩請?zhí)峁┫嚓P(guān)信息告之我們,我們將及時(shí)溝通與處理。本站內(nèi)容系統(tǒng)采集于網(wǎng)絡(luò),涉及言論、版權(quán)與本站無關(guān)。