前言:最近有朋友在做小程序的過程中,遇到開發過飛入購物車效果的功能的需求。針對這個情況一些網上的demo,多少會有一些不符合情景的問題(bug)存在,針對這一情況小編決定幫朋友寫一個方案來幫助解決問題。
思考如果實現 ? 超級簡單的!
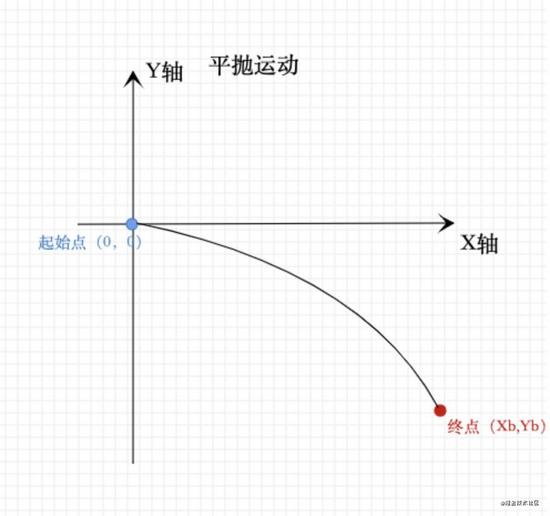
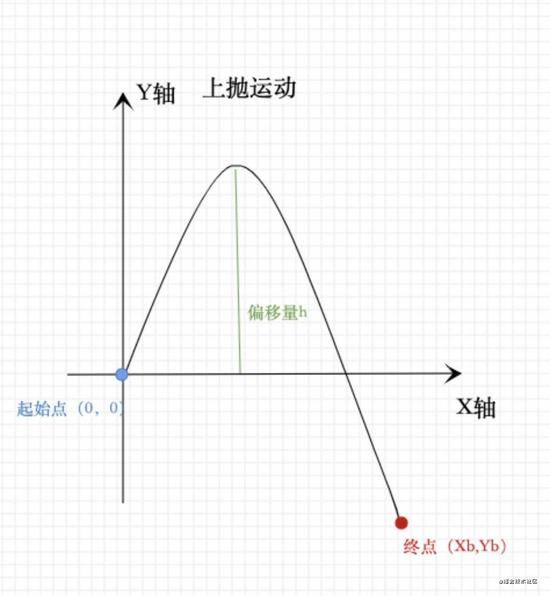
無論是小程序還是h5飛入購物車無非就是 平拋 ,或者是 上拋 兩種情況,對于這兩種情況,初中就開始學習拋物線理論知識是完全可以搞定的,高中一年級物理學的自由落體運動,平拋運動就是拋物線理論的具體實現。
平拋運動
上拋運動
構建虛擬直角坐標系,拋物線繪制軌跡點
此方案的本質就是,根據購物車起點和終點,分別做為拋物線的兩點,這樣一個感念就是要以起始點作為直角坐標系(0,0)方便后續其他坐標點的運算。還有一個應該注意的是,如果是配置了上拋h偏移量 ,就要求最高點(頂點)坐標 此方案均適合 H5 ,小程序
/**
* 飛入購物車,軌跡點繪制
* @author  👽
* @param {Array} start`在這里插入代碼片`Point 起點clientX, clientY值 (必要)
* @param {Array} endPoint   終點clientX, clientY值 (必要)
* @param {number} point     點數          (必要)
* @param {number} h         拋物線向上高度(上拋運動)  (可選)
* @param {number} hclientX  當存在h情況下,達到最高點時候的clientX值
* @return {Array}  [ left ,top ] 值組成的數組
*/
function flycart(startPoint, endPoint, point, h = 0, hclientX) {
   /*
   設置startPoint 為(0,0)點 , 此拋物線經過(0,0)點 ,可以推到出模型關系式 y =  ax^2 + bx 或者 y = ax^ 2
   1 當存在 h 的情況,拋物線會y軸向上偏移 h, 此時的關系式 y = ax^2 + bx
   2 當不存在h 的情況 ,拋物線startPoint為頂點, 此時關系式 y = ax^2
   */

   /* 參數校驗 */
   function Validityparameter() {
       let isOkey = true
       Array.isArray(startPoint) && startPoint.length !== 2 && (isOkey = false)
       Array.isArray(endPoint) && endPoint.length !== 2 && (isOkey = false)
           (point.constructor !== Number) && (isOkey = false)
       return isOkey
   }

   /* 參數驗證 */
   if (!Validityparameter()) {
       return []
   }

   /* A點橫坐標 */
   const xA = 0
   /* A點縱坐標 */
   const yA = 0
   /* x軸偏移量 */
   const offsetX = startPoint[0]
   /* y軸偏移量 */
   const offsetY = startPoint[1]
   /* B點橫坐標 */
   const xB = endPoint[0] - offsetX
   /* B縱坐標 */
   const yB = endPoint[1] - offsetY

   /* 根據B點坐標和最大高度h求系數a,b 參數*/
   let b = 0
   let a = 0

   /* 計算系數 a ,b */
   function handerComputer() {
       if (h < 10) {
           a = yB / Math.pow(xB, 2)
       } else {
           /* 因為一般購物車的情況都是向下,實際上我們購物車的坐標系是反向的,所以我們這里要把h 設置成負值 */
           h = -h
           /* 一元二次求解a,b ,現在知道一點  ( xB , yB ) 另外一點 ( maxHx,h )  */
           /* 有效達到最高點時候的x坐標 */
           const effectMaHx = hclientX && Math.abs(hclientX - offsetX) > 0 && Math.abs(hclientX - offsetX) < Math.abs(xB)
           /* 如果hclientX不滿足要求,則選A , B 中點為   */
           let maxHx = effectMaHx ? (hclientX - offsetX) : (xB + xA) / 2
           /* 已知兩點 求 a , b值  根據解方程式解得 y = ax^2 + bx  */
           a = ((yB / xB) - (h / maxHx)) / (xB - maxHx)
           /* 將 a 帶入其中一個求解 b */
           b = (yB - a * Math.pow(xB, 2)) / xB
       }
   }


   /* 軌跡數組 */
   const travelList = []
   /* x 均等分 */
   const averageX = (xB - xA) / point

   /* 處理直線運動 */
   function handerLinearMotion(type) {
       if (type === 'X') {
           const averageY = (yB - yA) / point
           for (let i = 1; i <= point; i++) {
               travelList.push([offsetX, i * averageY + offsetY])
           }
       } else {
           for (let i = 1; i <= point; i++) {
               travelList.push([offsetX + i * averageX, offsetY])
           }
       }
       return travelList
   }

   /* 當 xB的絕對值小于10的情況,我們看作Y軸直線運功    */
   if (Math.abs(xB) < 10) {
       return handerLinearMotion('X')
   }
   /*當 yB的絕對值小于10的情況,我們看作x軸直線運功  */
   if (Math.abs(yB) < 10) {
       return handerLinearMotion('Y')
   }

   handerComputer()
   /* 繪制路徑 */
   for (let i = 1; i <= point; i++) {
       const currentX = averageX * i
       const currentY = Math.pow(currentX, 2) * a + b * currentX - yA
       travelList.push([currentX + offsetX, currentY + offsetY])
   }

   return travelList
}

export default flycart
效果

小程序h5飛入購物車組件?
這里可以把這個方案和組件聯系到一起,于是乎飛入購物車組件就搞定了,這里大家要記住的點
1此方案得到的是拋物線各點的left,top值,我們只需要定時改變飛入購物車的圖片的left值 ,top就可以 2可以通過計數器功能來改變縮放比,說白了就是改變圖片transform:scale值 3不要忘記給圖片加上fixed固定定位哦:smile::smile::smile: 主要demo方法(僅供參考)
 startCart(){
    /* 開啟購物車 */
    /* this.start 儲存起始點 clientY clientY  ,this.end儲存最終點 clientX clientY*/
    this.start = {}
    this.start['x'] = this.data.current['x']
    this.start['y'] = this.data.current['y']
    const travelList = flycart([ this.start['x'] , this.start['y'] ] ,[ this.end['x'] , this.end['y'] ],25,50 )
    this.startAnimate(travelList)
        },
 startAnimate(travelList) {
    let index = 0
    this.setData({
        cartHidden: false,
        bus_x: this.start['x'],
        bus_y: this.start['y']
    })
    if(travelList.length===0) return
    this.timer = setInterval( ()=> {
        index++
        const currentPoint = travelList.shift()
        this.setData({
            bus_x: currentPoint[0],
            bus_y: currentPoint[1],
            scale: 1 - index / 25
        })
        if (travelList.length === 0) {
            clearInterval(this.timer)
            this.triggerEvent('close')
        }
    }, 33)
}
這里只做了 原生小程序飛入購物車組件 ,h5大致差別不大。
git地址如下
代碼地址https://github.com/AlienZhaolin/flycart
到此這篇關于html5小程序飛入購物車(拋物線繪制運動軌跡點)的文章就介紹到這了,更多相關html5飛入購物車內容請搜索腳本之家以前的文章或繼續瀏覽下面的相關文章,希望大家以后多多支持腳本之家!