最常用命令
搜索軟件: brew search 軟件包名稱
安裝軟件: brew install 軟件包名稱
卸載軟件: brew uninstall 軟件包名稱
錯誤解決
問題1 : curl: (7) Failed to connect to http://raw.githubusercontent.com port 443: Connection refused” 錯誤
解決方法:
打開 www.ipaddress.com 網站查詢 raw.githubusercontent.com 主機的真實IP
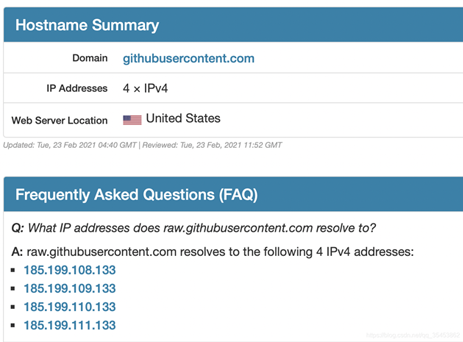
打開 /etc/hosts 文件,增加一條記錄
185.199.108.133 raw.githubusercontent.com
問題2 :如果 brew install 出以下錯誤, 則安裝時使用 arch -arm64 brew install 軟件包名 進行安裝

創建安裝目錄
Homebrew 安裝腳本會將程序默認裝至 /usr/local/Homebrew ,這是 Intel 芯片架構上的安裝路徑,M1芯片上則需要安裝到 /opt/Homebrew/ 下。
sudo mkdir -p /opt/homebrew
sudo chown -R $(whoami) /opt/homebrew
下載 homebrew 包并解壓至 /opt/homebrew 目錄
curl -L https://github.com/Homebrew/brew/tarball/master | tar xz --strip 1 -C homebrew
如果下載慢,可以直接通過 https://github.com/Homebrew/brew/tarball/master 或本地下載,copy 到 /opt 目錄下再將壓縮包解壓到 /opt/homebrew 目錄
cp /opt
tar xz 壓縮包名 --strip 1 -C homebrew
將路徑增加到PATH環境變量中
#在 .bash_profile 中新增
export PATH=$PATH:/opt/homebrew/bin;
#保存退出
#刷新生效
source ~/.bash_profile
修改源
cd "$(brew --repo)"
git clone https://mirrors.ustc.edu.cn/brew.git


cd "$(brew --repo)/Library/Taps/homebrew"

git clone https://mirrors.ustc.edu.cn/homebrew-core.git

git clone https://mirrors.ustc.edu.cn/homebrew-cask.git

brew update #更新
其它鏡像地址:
HomeBrew 官方鏡像:
brew: https://github.com/Homebrew/brew
core: https://github.com/Homebrew/homebrew-core
cask: https://github.com/Homebrew/homebrew-cask
清華大學鏡像:
brew: https://mirrors.tuna.tsinghua.edu.cn/git/homebrew/brew.git
core: https://mirrors.tuna.tsinghua.edu.cn/git/homebrew/homebrew-core.git
cask: https://mirrors.tuna.tsinghua.edu.cn/git/homebrew/homebrew-cask.git
中科大鏡像:
brew: https://mirrors.ustc.edu.cn/brew.git
core: https://mirrors.ustc.edu.cn/homebrew-core.git
cask: https://mirrors.ustc.edu.cn/homebrew-cask.git
終于可以進行下載軟件了
到此這篇關于Mac M1安裝Homebrew的方法步驟的文章就介紹到這了,更多相關M1安裝Homebrew內容請搜索腳本之家以前的文章或繼續瀏覽下面的相關文章希望大家以后多多支持腳本之家!
您可能感興趣的文章:- Mac M1安裝mnmp(Mac+Nginx+MySQL+PHP)開發環境
- Macbook air m1安裝python/anaconda全過程(圖文)
- 本地Docker安裝Postgres 12 + pgadmin的方法 (支持Apple M1)
- 2020Mac M1安裝jdk和IDEA的詳細方法
- M1芯片安裝mysql8.0數據庫的實現步驟(圖文)
- M1芯片安裝python3.9.1的實現